
How to Improve your SEO + AIO in Squarespace (step-by-step)
SEO (Search Engine Optimization) has changed a lot in the past year especially now that AI has taken over the scene. SEO already felt very complicated and now we have to make sure we are showing up in AI recommendations (also known as AIO or GEO) and the whole thing can feel a little overwhelming. Squarespace is really slow when it comes to delivering on SEO (especially compared to Wordpress) but I will still choose Squarespace over any other platform out there and in this article I’ll share a few tips with you to improve your SEO and your AIO specifically in Squarespace.
So let’s get into it! Here’s how to improve both your SEO and AIO (or GEO) in Squarespace
ways to get the most out of your seo and get recommended by ai
The first thing I want to cover are some ways to improve your SEO and how to get recommended when people are asking Chat or Claude for options related to what you do.
If you’re into slow marketing like I am and you don’t want to be on social media all day long you’re in luck. Social media has improved when it comes to Google searches but not so much with AIO (GEO). I’m going to give you my tips and tricks that are outside of social media because I hate it so much and I truly believe there is a better way to market your business that doesn’t burn you out.
Blogging: You don’t need to be a professional blogger to have a blog that works. Both Google and AI love a good blog post and this is the most direct way to improve your SEO/AIO on your website. Don’t worry about keyword research for your blog posts, what you really need are questions your clients are asking and then turn those into blog posts that are 1500 words or more and give real value. Use H2 for headings so Google can quickly scan your website and write your posts as if you were answering a question a friend asked you. You can use Chat or Claude for ideas or to write your posts just make sure you edit them so they sound like you and not AI.
Pinterest: Not only is Pinterest a search engine (not social media), it gets shown in search results on Google as well, so turn your blog posts into pins that are SEO optimized. I had Chat help me optimize the title and description and I realized that it was turning my titles/descriptions into boring unclickable little things so I changed up how I was doing this. The key is to have one keyword for each pin that’s centered around that post and make the titles and descriptions more engaging so that when people click on your pins they are more likely to click on the links.
For example: Let’s say you are a nutritionist and you wrote a blog post titled “How to improve your diet in 2026” and you created a pin for it with catchy text (I recommend creating 5-10 pins for each post and then space those out on Pinterest). You can use “improve your diet” as the keyword and then vary how you state that in each pin title/description. You can also choose another highly searched term that relates to improving diets and use that in your titles and descriptions. So this might require a bit of research on Pinterest for your area of expertise. But Pinterest makes it pretty easy, if you go to the search bar and start typing “diet” or “nutrition” into the search bar it will show you a whole bunch of recommendations. Use those in your pin titles and descriptions to get more eyes on your pins. The key is to have the keyword in your title and once in your description.
LinkedIn: This one gets great SEO and AIO and you can take your blog posts and either turn them into articles on LinkedIn or posts that link back to the article. I am still learning the ins and outs of using LinkedIn but so far I really like it and it came highly recommended as a form of slow marketing since you only need to post 1x/week (which is so nice).
Podcast: If you’re into talking away about your work this is one of the most highly effective ways to get recommended by AI especially if you are using video and posting to YouTube in addition to your podcast platform. Plus you can turn those episodes into blog posts that include your transcripts and embed the video then send it out to your newsletter. Easy peasy, done. You can join other peoples podcasts and when they mention you this will also put you on the list for great AIO.
Doing the Prep Work for SEO
Now let’s get into doing the actual work on your website and your pages.
It’s important that you include searchable keywords in your copy (text) for all of your website pages. However, you still want it to sound human so I’ll share with you a few tricks so you don’t need to keyword stuff all over your copy (because this will decrease conversions), and you can let your blog or other marketing do the heavy lifting. The keywords need to be different for each page but fall under the same umbrella of what you do and what you want to show up for on Google.
So when you are doing your Brand Discovery and deciding who your ideal client is you also want to decide what you want your keywords to be. You can do some research using the Google Keyword Planner or another SEO tool.
For example, if you are a relationship coach and you help couples with intimacy and passion in their relationships you will want to use keywords such as:
“Intimacy Coach or Intimacy Coaching”
“Relationship Coach”
“Intimacy Coaching for Couples”
These all fall under the umbrella of what you specialize in and you will want to use different versions for different pages that make sense to the content of that page.
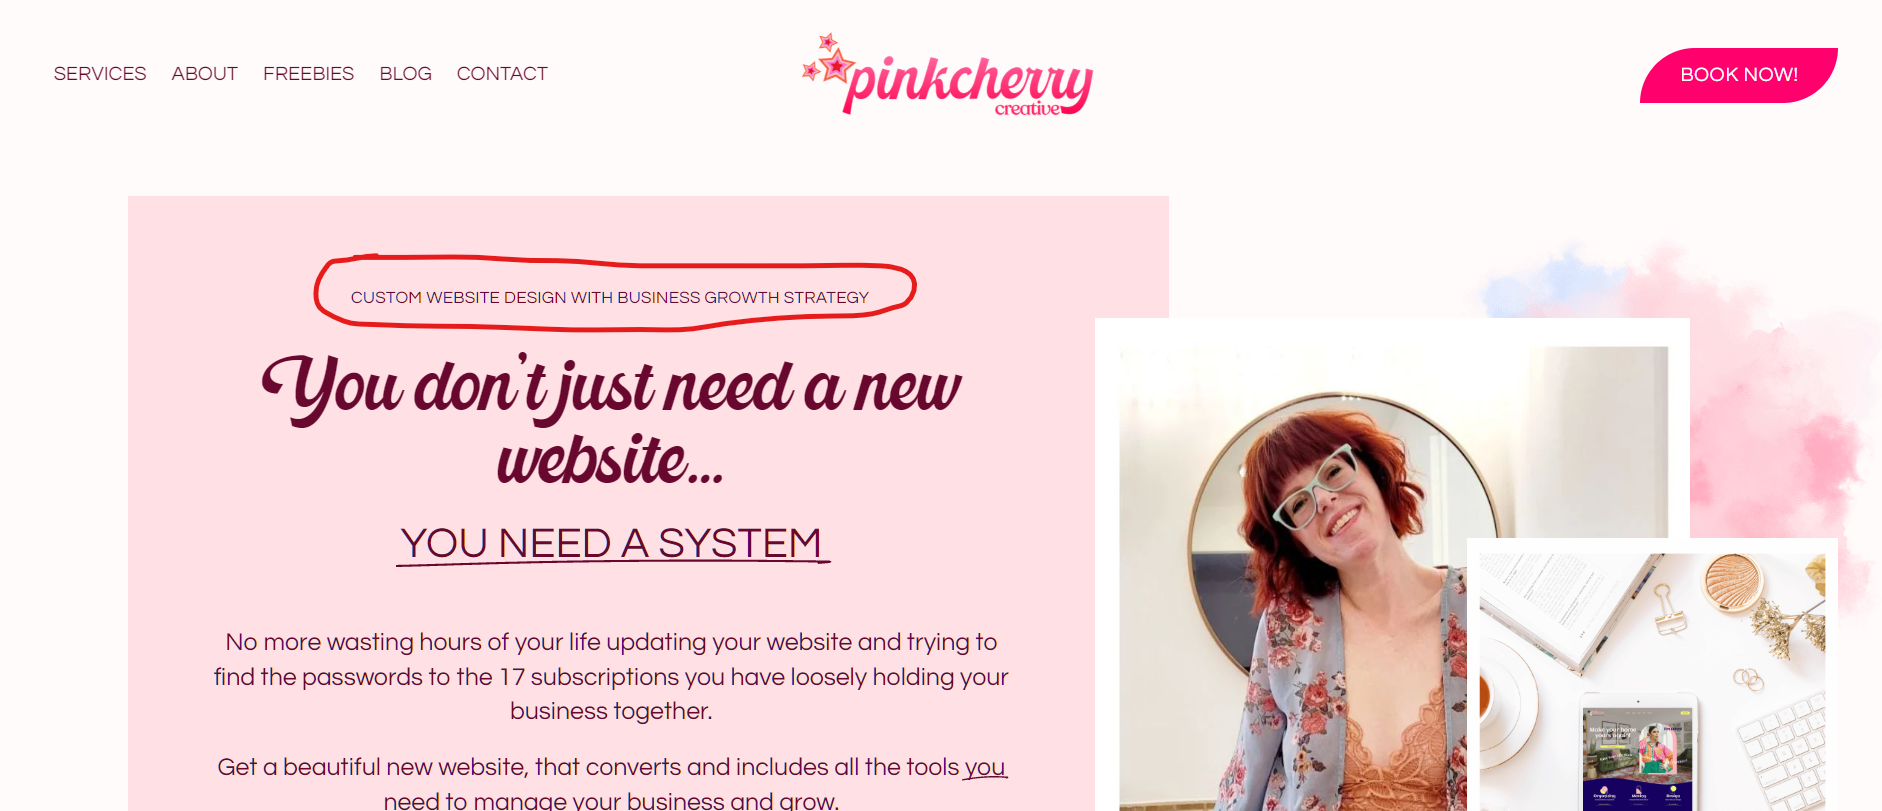
Now, let’s talk about how to include these keywords so your copy can be beautiful, speak to your ideal client and you’re not trying to write your copy around a keyword. Sometimes your keyword might naturally fit into your copy and that’s great. But if it doesn’t you can use “eyebrow” text above your titles. This is little paragraph text that is very small that goes above your heading, (see image below). You don’t need to do this all over the page just once or twice is sufficient.
Another thing to be aware of is that you want to have at least 500 words on every page you create and your keyphrase should be included 2-3 times on the page. This makes your website look legit to Google.
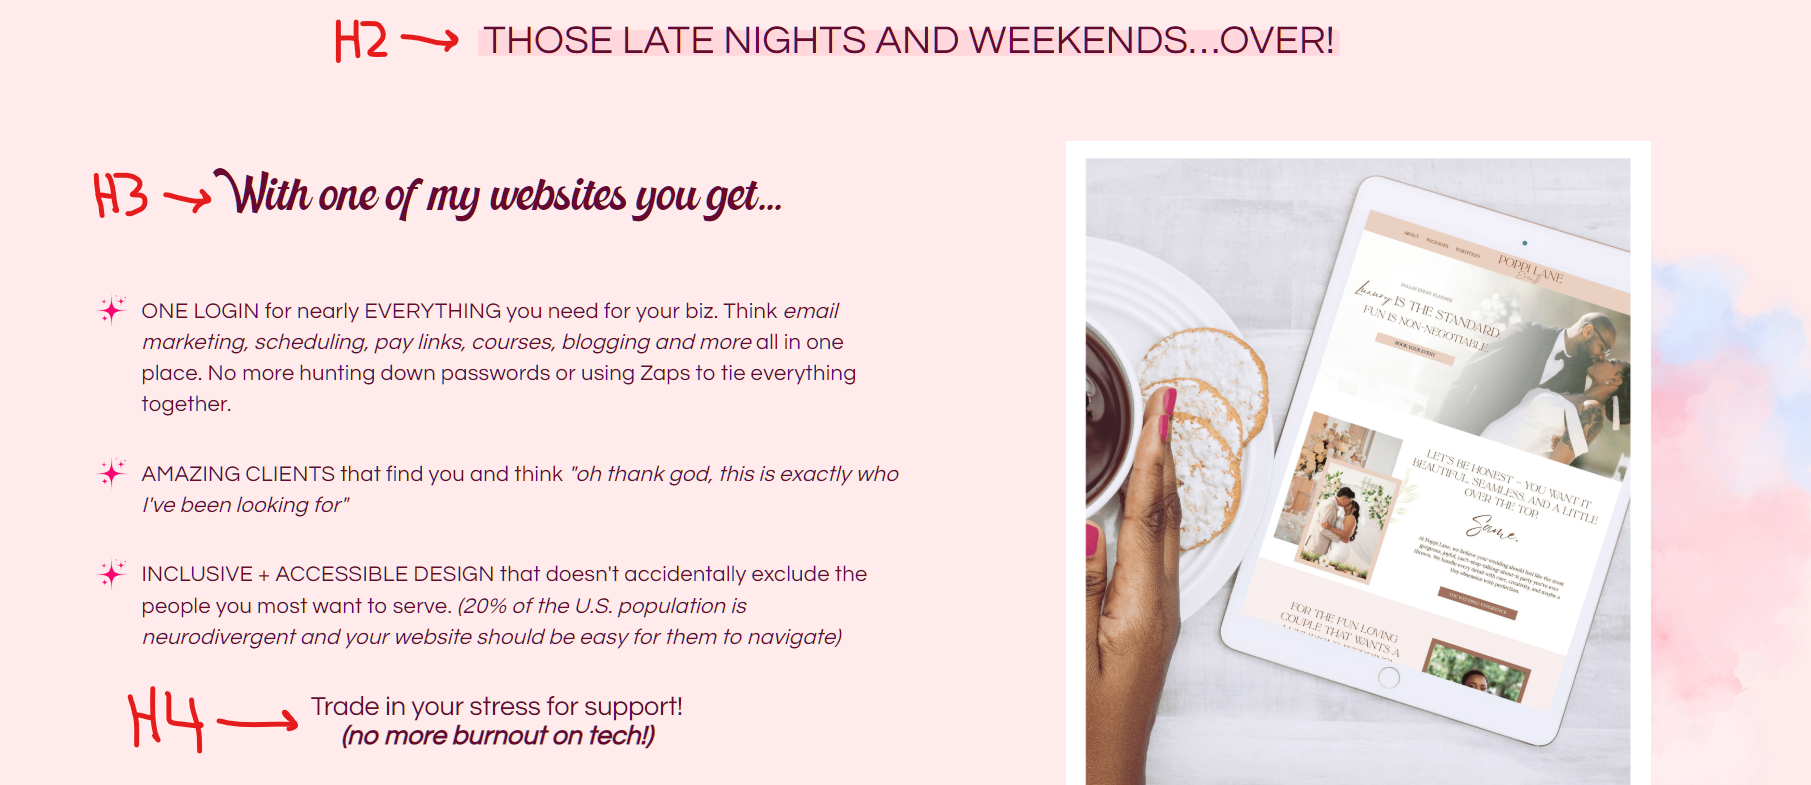
An overlooked aspect of SEO is that your pages and your blog posts need to use headings correctly. So Heading 1 is only used once at the top of the page. For each section below that you will use Heading 2 at the top and then if necessary Heading 3 below that and Heading 4 below that, everything else should be in paragraph text, and you can use paragraph text in between headings. This is so Google can correctly read your copy and it provides accessibility to people using reading assistance who have low or no vision. (see image below)
If you can get your website linked on other websites (i.e. write a great blog post that gets shared, write an article on another website where they will link back to your website, be a guest on a podcast, etc.) that improves your SEO and AIO by A LOT!
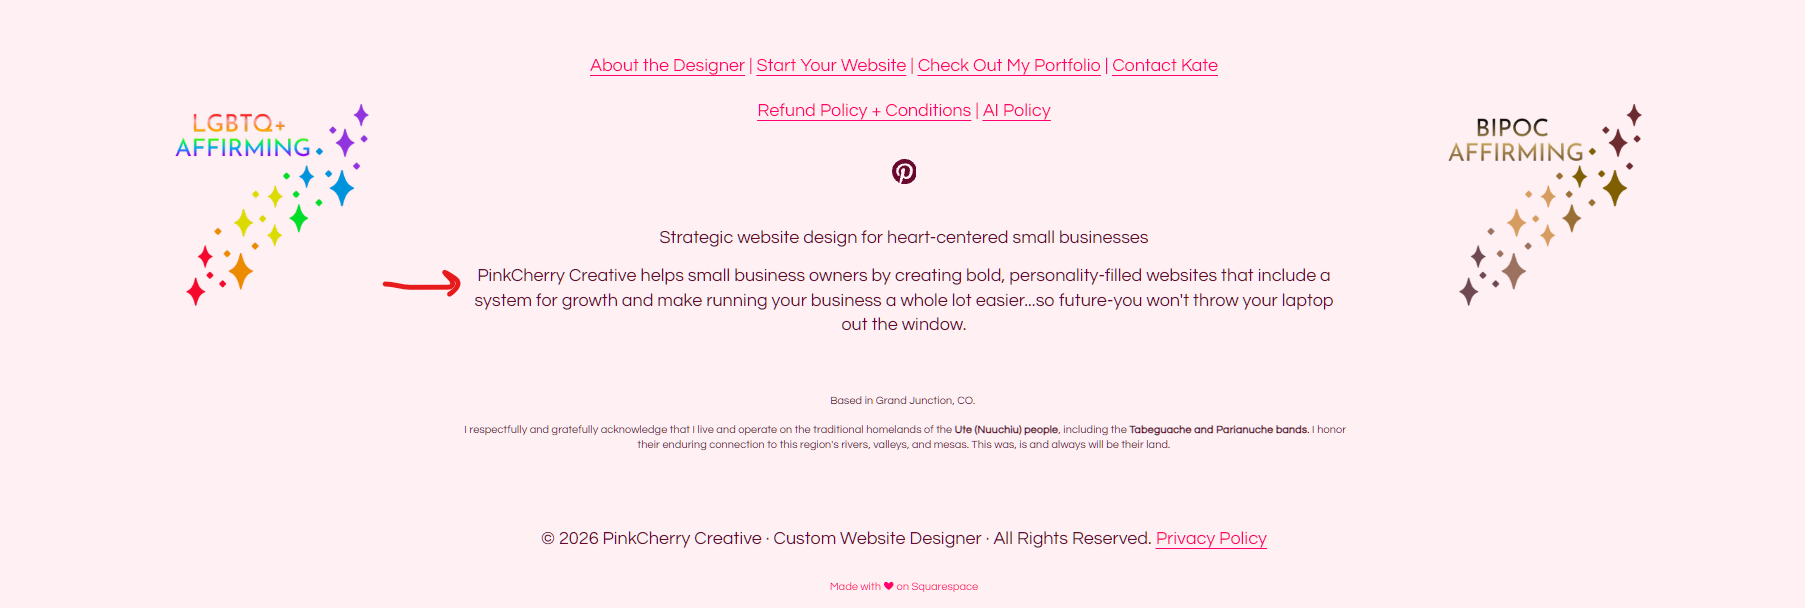
Add your business description to your footer. This is a statement that describes what you do and includes your keyword. Since it’s in the footer it will be on every page of your website and Google AI pulls from this to describe your business to people searching in your industry. Its short - 1 or 2 sentences and can include your location as well so Google will serve your website when people are looking for services near them. (see image below).
SEO Options on Squarespace
Once you have your keywords ready to go and you have created your copy for your website, you’ll want to start designing your website and adding in all your text and images, if you are DIYing of course.
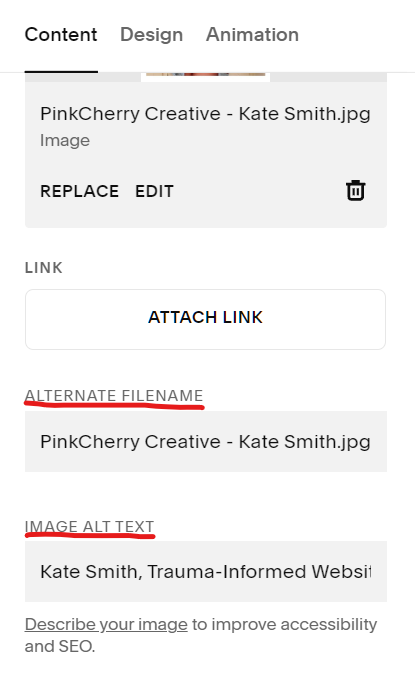
As you add images you will see the option for “Image Alt Text”. This isn’t just for SEO, its also for accessibility. Describe that image as you would to someone who couldn’t see it and then you can add your keyword or the name of your company at the end of that sentence. I don’t recommend using the same keyword over and over on ALT text - make sure whatever you are using is relevant to the page the image is on and slightly differs on each image on that page.
There is an option in Squarespace for AI to do this for you and you can edit the descriptions it generates to include your keyword, your company name, etc. (I will show you how to do this later on in this post).
Do this for EVERY image on your website. Another option for your images is to create an alternative file name which I recommend using a variation of your keyword here as well. (See the image below - this is ALT Text that I added on a picture of me that has my name and describes what I am wearing).
Next, you will want to go into the SEO options tab for each page of your website. To do this you will want to hover over the page on the left side menu of your Squarespace Dashboard. You will see a little gear icon pop up to the right of the page title. Click on that and a window will pop up. On the left hand side click “SEO”. See image below:
On that page there will be the option to fill in your SEO title and your SEO Description. It says this is optional but if you want to show up on Google, fill both of the fields in and include your keyword.
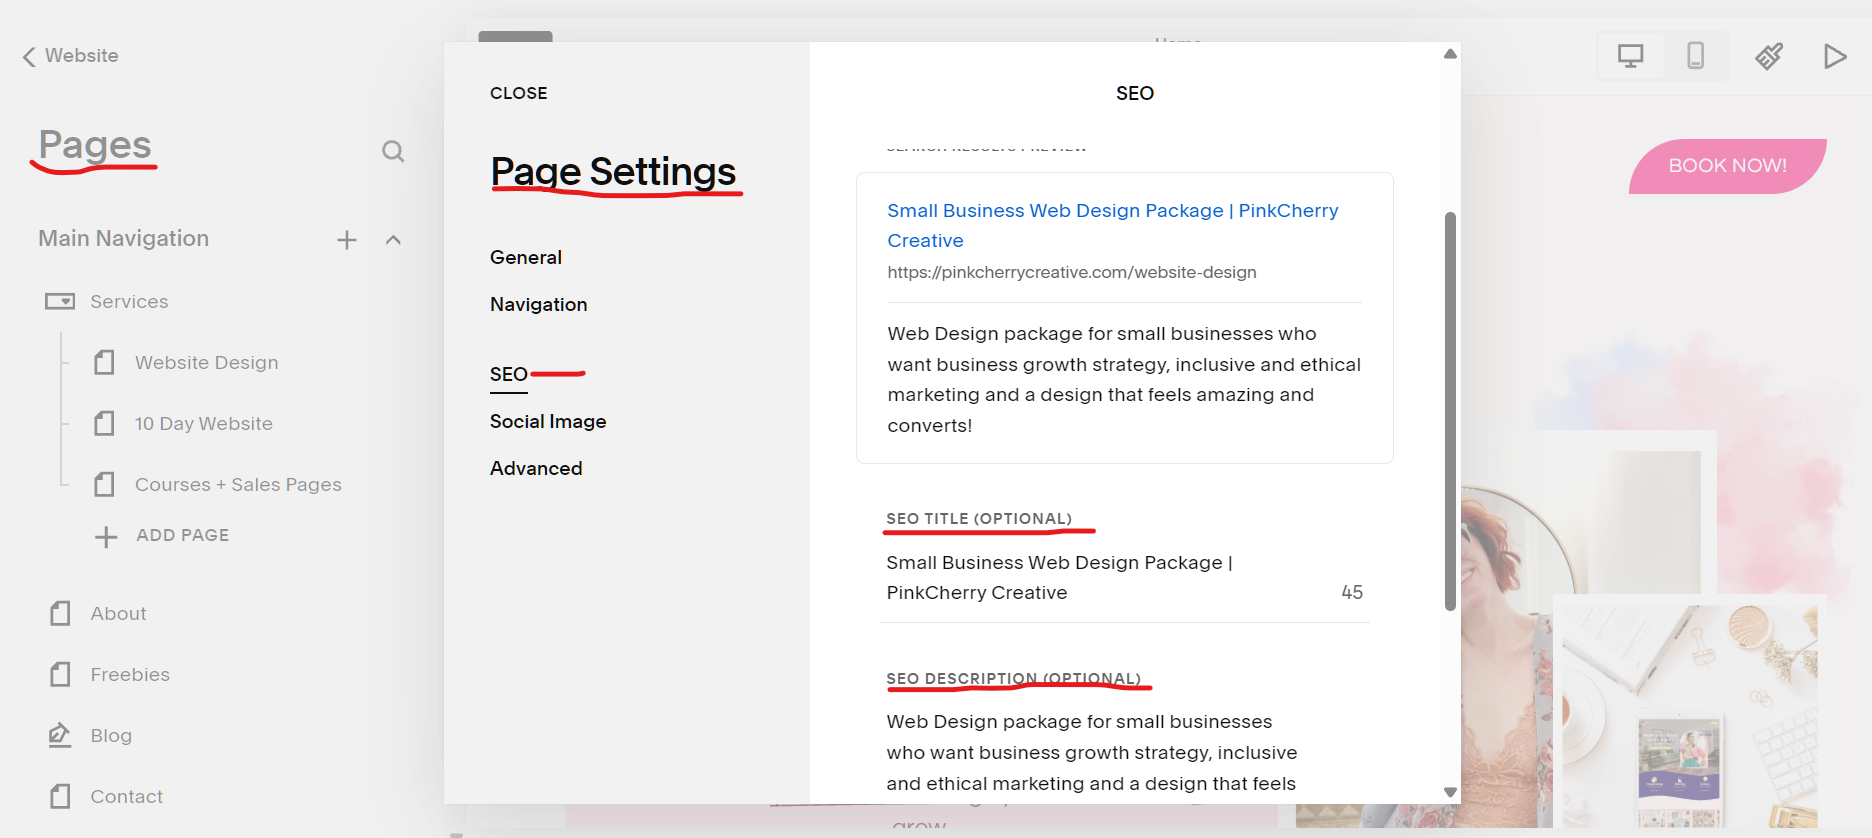
The title field can be what you named your actual page (as long as your keyword is in there, please make sure it is), and the description field should include some text from the page that has your keyword and is under 300 characters.
You can also add a social image so that when you share the link it populates a pretty image from your page!
For your homepage there is a specific place to access the SEO for that page as you will notice when you try to edit the options. Scroll to the bottom of the SEO options screen and click “Edit Website SEO Settings”. It will then take you to the page that controls the main SEO settings for your website as a whole. (see image below)
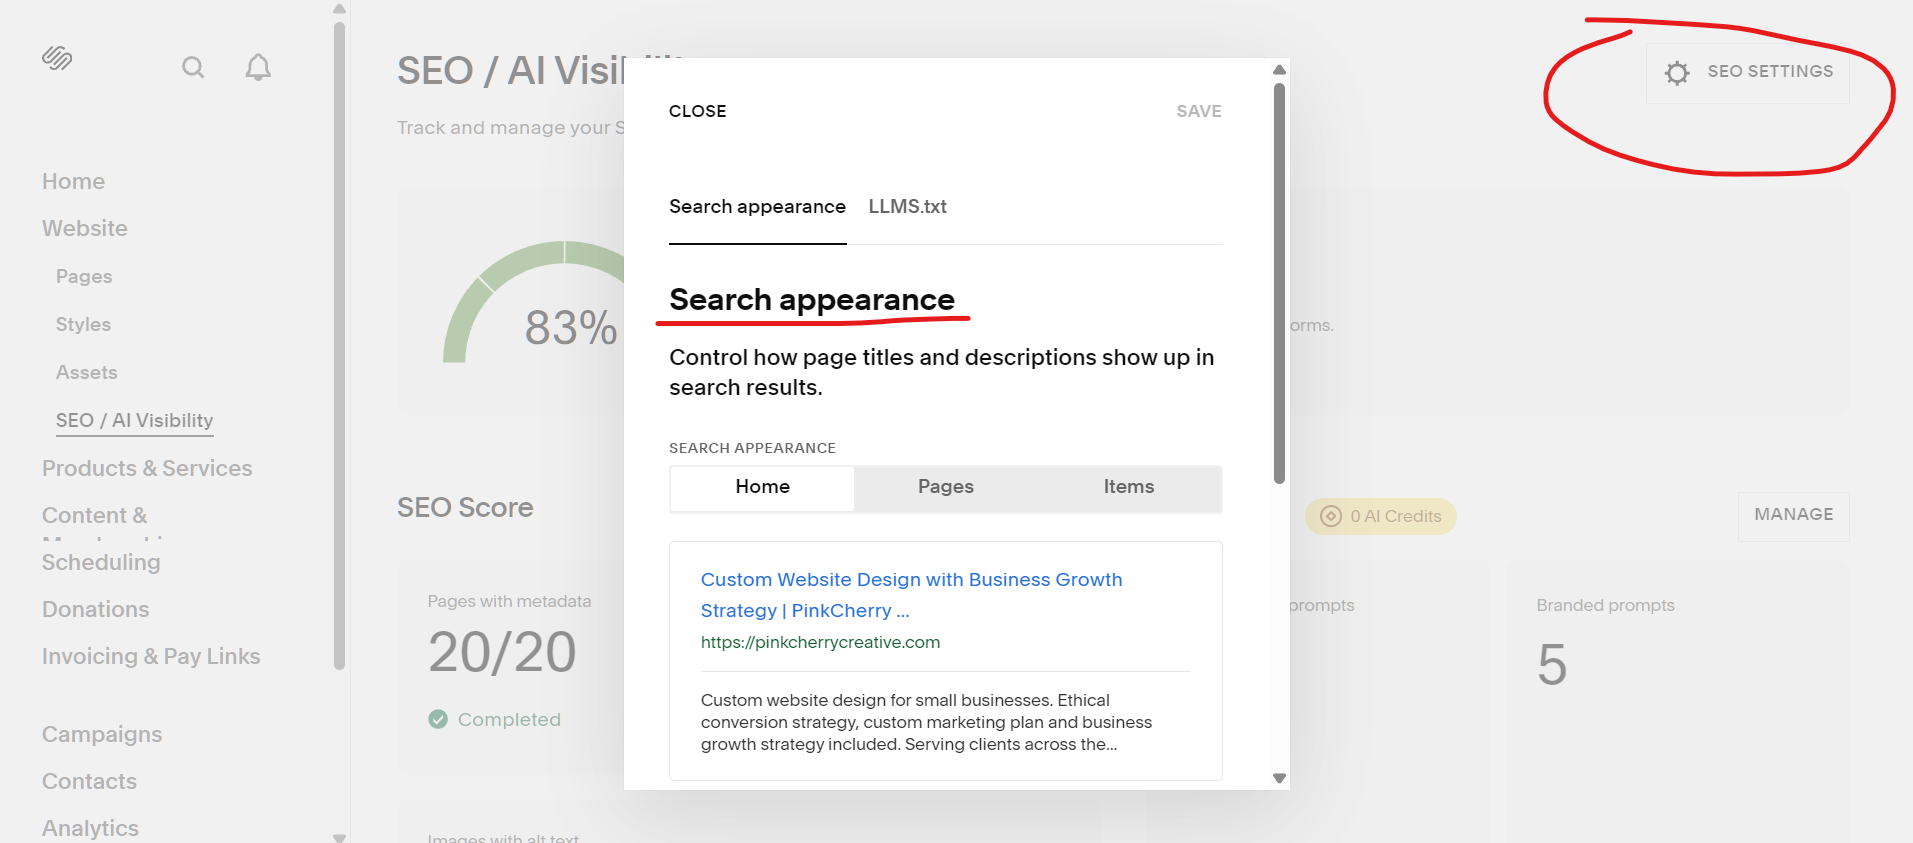
Edit the title and description just like you did on the other pages and click save, but don’t exit that window yet! You will also notice there is a tab at the top that says LLMS.txt. This is a relatively new option but it is kind of like a map of your website for AI visibility. I highly recommend having Chat or Claude create this text file for you to give you max visibility. You can then edit anything you want on the text file and copy and paste it into the box on that section.
using the aio options in squarespace
Squarespace offers AIO options as well to make your life a bit easier and if you have a lot of images on your website, I recommend using the AIO options because writing ALT Text is time consuming AF. Just make sure you edit them so they make sense and include your keyword where it makes sense, (you don’t have to have your keyword on every single image. You can also use your name, your company name or just your title).
See image below for where to access the AIO options:
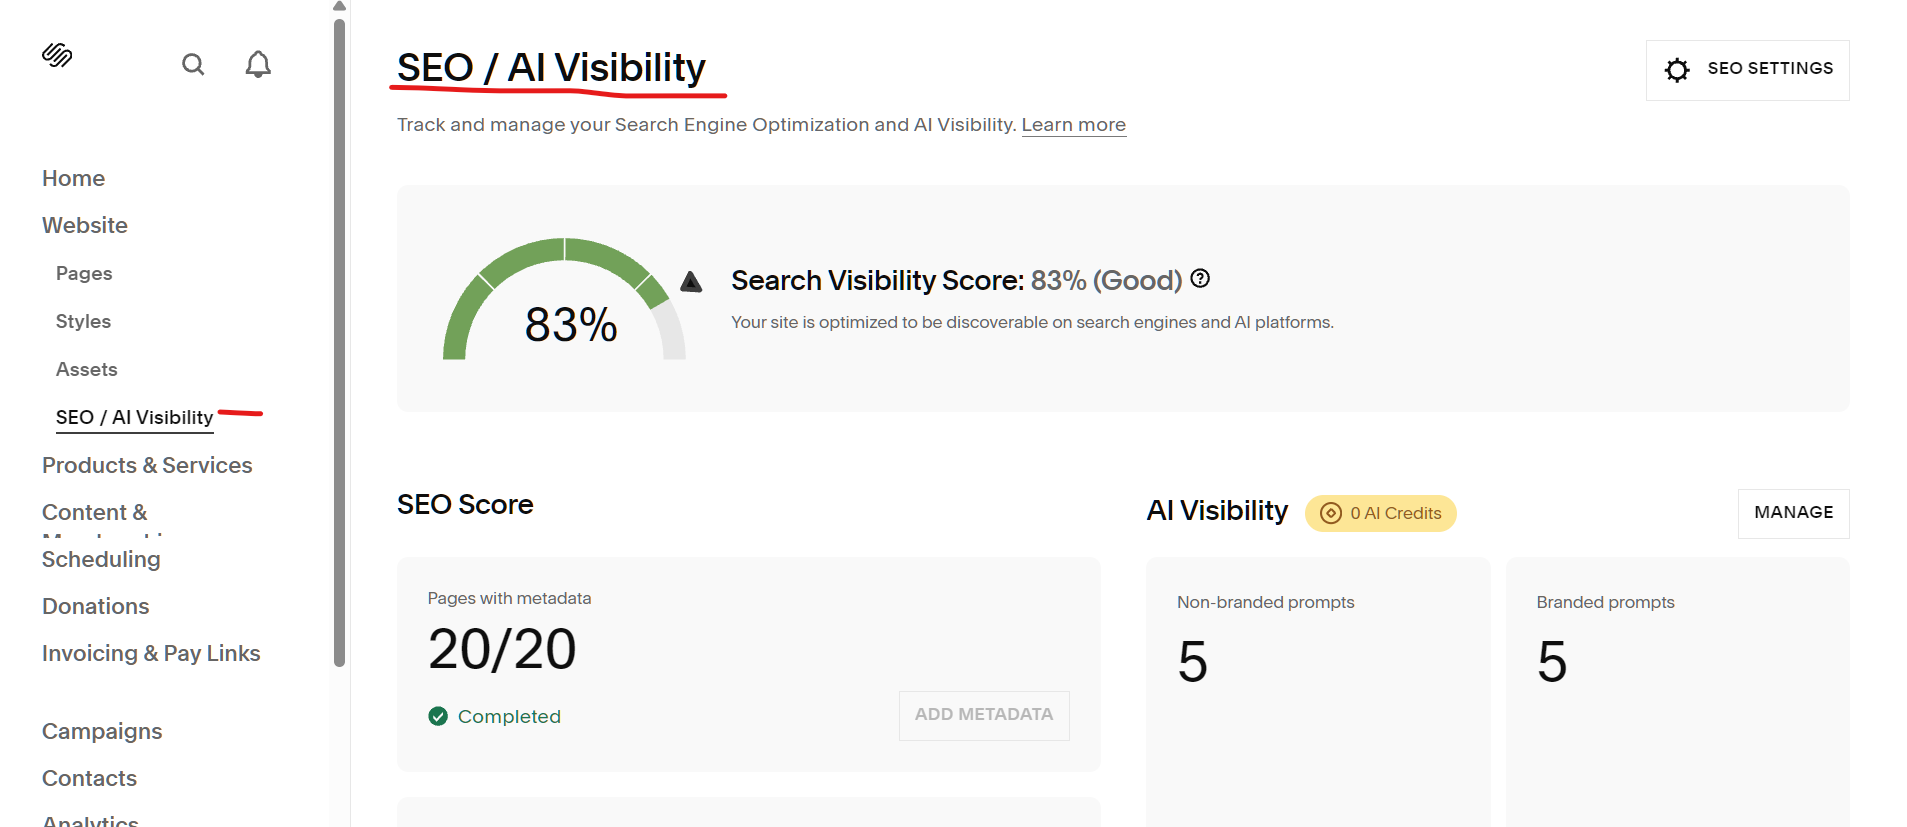
Your screen might be a bit different if you haven’t used their AI Visibility tool yet. Instead it will have a banner at the top prompting you to use the AI Visibility tool to see how optimized your website is. If you just setup your website or your SEO I would wait a bit to do this. You have to use credits and they only give you 10 prompts - so waiting until you have a bit of established SEO presence is best. I would give it 3-6 months after you’ve setup your SEO.
Using the AI tool for image alt text
On that same screen if you scroll down you will see a box that says “Images with alt text” and it will show you how many are missing. Click on the button that says “Add Alt Text” and agree to the terms and it will give you a screen that shows all of your images along with a generated description you can edit. Edit each one to your satisfaction and you’re done!
connect google search console to squarespace
Ok I know this is so much and there are a lot of steps but I swear this is the last one I am going to share with you. I wouldn’t try to do all of this in one go - you can always save this post and come back to it as you do each step.
The last thing you want to do is connect Google Search Console to your Squarespace website. From your Squarespace website on the left hand side menu click on Analytics and then Traffic. On that page click on “Search Keywords” it should have an option for you to connect Google Search Console. If you haven’t signed up for this yet with Google then simply click on that button and it will prompt you to create an account with your Google email and connect your website. Once that is done you can monitor what search terms people are using in Google to find you and the traffic that is coming to you from Google.
And that’s all folks! I hope these tips were helpful and just remember even with all of this done it can still take 6+ months for your website to start showing up on Google, so have patience and go do something fun in the meantime.